
Background
Metadata is a collection of data items that describe an artifact – in our case, most commonly an image. Descriptors (fields) such as Artist, Title, and Tags (or Keywords) are attached to images to make them easier to find and group together.
First and foremost, we want to know who submitted the image. We do this via the Artist metadata field. This also helps you claim credit for your work.
In our galleries, we display the title in the lower left corner when the viewer hovers over the image. Here’s an example:

For our competitions, we think the title helps set the proper context for good judging – and we want to keep it clean and simple by showing only the title and not a description. For this reason, we ask that the Description field be blank. (The service provider we use displays the Title and Description and currently does not allow us to choose what metadata fields are shown.)
Here is some guidance on how to update metadata for your images in Lightroom, Photoshop, Windows File Explorer, and MacOS.
Also, we posted a video showing several of these options on our YouTube channel.
Editing metadata in Lightroom
A. Open the Library page.

B. Scroll to the Metadata panel and enter values for:
1. Title [Strongly encouraged] = your name for the image
2. Caption [Required] = must be blank
3. Creator [Required] = your name (since you made it)
4. File Name [Required] = your preferred file name for the image
Every file must have a name that is originally assigned by the camera. Though we are not mandating a specific convention at this time, keep in mind a good name can help ID the file as yours (versus a name like “DSC_2495.jpg”). For example, a more useful name is: LastName_Initial_[date_time of the image].
5. [Optional] Copyright = your copyright message
6. [Optional] Copyright Status = Copyrighted (right? )

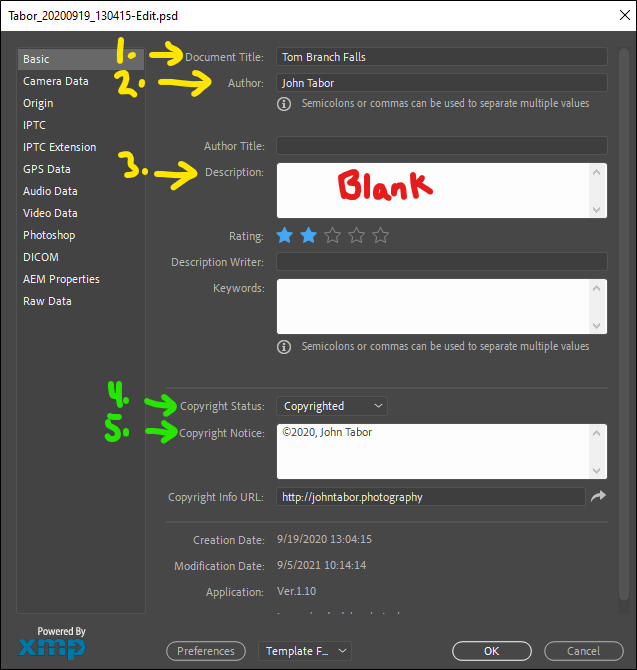
Editing metadata in Photoshop
The method of exporting an image from Photoshop can affect whether (and how much) metadata is included. Consider using the “Quick Export as JPG” option to include all the necessary fields for LPC competitions.

Follow these steps to edit metadata in Photoshop:
A. Click File | File Info (Alternate method: Alt+Shift+Ctrl+I {I as in “info”} or Opt+Shift+Cmd+I)
B. Open the Basic panel from the list on the left side and enter values for:
1. Document Title [Strongly encouraged] = your name for the image
2. Author [Required] = your name
3. Description [Required] = must be blank
4. Copyright Status [Optional] = Copyrighted (right? )
5. Copyright Notice [Optional] = your copyright message
Editing metadata in Windows File Explorer (method 1 of 2)
A. Right-click the image
B. Select “Properties” from the pop-up menu
C. Enter values for:
1. Title [Strongly encouraged] = your name for the image
2. Authors [Required] = your name
3. Subject [Required] = must be blank

Editing metadata in Windows File Explorer (method 2 of 2)
A. Open the View tab.
B. Activate the Details pane.
C. Select the image to be updated and, in the Details pane, enter values for:
1. Title [Strongly encouraged] = your name for the image
2. Authors [Required] = your name
3. Subject [Required] = must be blank

Editing metadata in MacOS
A. Consider a tool such as Photos Exif Editor ($3.99 as of 9 Sep 2021). This is due to Apple not allowing direct edits to image metadata from Finder. There are other tools, but I think this one has one of the simplest interfaces.
B. Guidance for Photos Exif Editor metadata fields includes:
1. EXIF Data / General / Artist [Required] = your name
2. EXIF Data/ General / Image Description [Required] = must be blank
3. IPTC Data / Information / Object Name [Strongly encouraged] = your name for the image


Final Note
For the real geeks among us , the best fields to be populated are the following XMP Dublin Core namespace tags:
1. dc:Title (recommended) = your name for the image
2. dc:Creator (required) = your name
3. dc:Description (required) = blank